Saturday, April 6, 2013

Your alarm protects you, now protect your alarm!

After we discovered this vulnerability, saying that we had a total freak out is an understatement. So tripping over this solution was a dream come true. So many people are overly concerned about the style of blinds or couch they get trying to keep up with the Jones', but things like this get totally overlooked.


©2013 LineSafe

The box installed by your phone/internet utility service (left side of pic) on the exterior of your home is as vulnerable as a sleeping baby. All it takes is one snip of the cable and your phone/internet are done and with that go the communication vehicle for your monitored alarm that most likely communicates through your phone/internet. Cellular alarm home monitoring service is available but few of us actually get it.

A product from the people over at LineSafe completely protects the box and the wire from below  ground level as it enters the house and even has features that will set off your alarm if the box is tampered with...score!

©2013 LineSafe

From the LineSafe web site:
"If you think you are safe with a monitored home security system, then think again. Any  criminal can beat your system with a $2 pair of wire cutters. LineSafe is a powerful and affordable watchman. It becomes an armored guard for your phone line and for your alarm system."
  
That says it all as far as Im concerned...on to the install...

For those without FIOS, you should simply be able to follow the instructions on the LineSafe site, but for those of us with the new huge Verizon FIOS (Optical Network Terminal) box which looks something like this,  you will need to make some adjusting.


The first step will be to run a wire from an open zone on your alarm to the LS box. Your alarm company will gladly do this for you if you're not sure what it means. After thats done follow the instructions on the LS web site to connect it to your box.


To the Verizon box (not voiding anything):
1 - Remove the outer door. It is just held on with two plastic curved arms and one screw, just gently pry them off with a flat head screwdriver


To the LS box itself:
1 - The hinges of the FIOS box are a tiny bit too wide so we will need to shave off about 3/16"  next to the LS mounting holes as well as a small portion on the bottom to give some clearance to the coaxial cables going into the house.

This can easily be done with a Dremel tool with a carbide bit, or even just contacting a local sheet metal/steel place and they can do all of this for you in about 30 min. with a plasma laser which will give you a smooth factory looking cut.


2 - One of the unfortunate compromises because of the depth of the FIOS box (5.5") is that we will lose the functionality of the second barrier door (which is only at 4.25") that if the criminals get the first door open, they will be faced with having to do it all over again while your alarm has already called the police from the first door being opened.

Simply unlock, remove and set aside.

Now we need to disable the pressure switch for the inner door. The switch has two clips on the back holding it in, that if simply squeezed will come free. Remove the two wire connectors from the switch, snip the connectors from the wire, expose about 1/4" of wire and attach those two wires together closing the circuit, wrap with electrical tape and tuck

Even if the criminals see this connection and cut it, that will set off the alarm as well :)


3 - Reposition white component, this is held on with double sided tape and just needs to be moved over to the side of the black wire terminal block to gain some clearance.


4 - Cover the raw edges of the cutout on the bottom side. We found some foam, and this will serve to protect the wires from chafing against the cut box. Not that it should ever move.


OK now, you can test mount onto the wall. You will need to place the right side first and then maneuver your FIOS hinges inside your side cutouts. There may be wires that are rigid and difficult to move but you have to make sure that they are all protected  by the box.

Warning: The FI-O in FIOS means Fiber Optic which is light transmission and light beams in a straight line, that means that your black fiber optic cable cannot be bent in any hard angles. It can be coaxed to go where you want but dont bend it!

In addition, we assume no liability with any of the instructions provided, these are basic tips for you to help secure your box. Each installation is different and will require some strategic planning. Be careful.


Test fit successful. Now refer to your LineSafe documentation to formally install...good luck!

Wednesday, April 3, 2013

Water Leak Sensor


This is a great addition for your piece of mind anywhere that you have a water source, and it runs about $10. It is basically a battery powered water alarm that sounds whenever its sensor touches water.We had already purchased the Basement Watchdog backup sump pump so that even when the power goes out, we would have a plan b to keep our basement from being flooded, and it comes with its own alarm--and just as we were about to install it, we found out that doing it before the 2-year mark will void our plumbing  warranty from Ryan on the original sump, so it sits in the corner waiting for 2-years/1-day.

Quick lesson on sumps: You have a french drain installed around the outside of your house, so that as water seeps through the ground and reaches a certain level, it enters into the drain and fills up your sump crock (black round thing) in the basement. When the level of water in the crock makes the lever on the pump (which is inside the crock) activate, the pump turns on and  ejects water out of the crock. If your pump fails, the crock will fill up and overflow into your basement.


So, just to keep us sane we picked this up from amazon and tested it in a sink and it does its job. It has a 6ft extension cable for the sensor and can be placed in the basement sump crock, next to your hvac, water heater, under your clothes and dishwasher, sink cabinets...anywhere.

This is what we have now, not the prettiest but handles it's business.


Were going to drop the sensor inside of that black rubber stopper. It already has a cable going through it so this makes the most sense.

Installation is pretty self explanatory.


The box will go here


Run your fingers down the length of wire a few times to get it as straight as possible since it ships all wound up and wrinkly.

Drop into hole, and thread through rubber stopper


Our sensor ended up sitting about 6" above the incoming french drain pipe so if the pump doesnt activate for whatever reason, the alarm will sound. Its 85 decibels which is pretty loud.


Friday, March 29, 2013

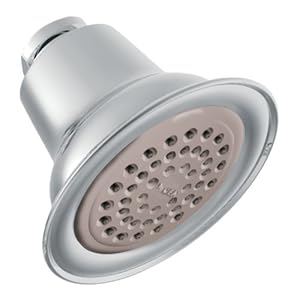
I GOT THE POWER! (in the shower)

I dont know about the rest of you guys but we love (read as need) a great showering experience in order for the day to begin on a good note. Some people are in and out in 5-10 min, that definitely isnt us!


In our old house we had amazing water pressure (and the bill to match), but having to adjust to these water-saving shower heads  which are very similar to the rainfall type leaves us wanting more.

So, if youre like us there is a simple solution...remove the water saving restricting filter!

Time: 5 min
Cost: $0
Difficulty: Easy

Tools Needed:
- Needle nose pliers/Flat head screwdriver
- Adjustable Wrench


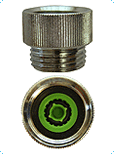
The restrictor is inside the shower head where it attaches to the shower arm.


Simply remove the shower head and then use the tip of a screw to remove the black o-ring and then pull out the restrictor with the needle nose pliers.

Or if you want to leave the o-ring in place, you can simply use a screwdriver and puncture the restrictor right in the center.

Done!  Instant fire hose :-)

Friday, March 22, 2013

DIY Iron Baluster Upgrade - Straight Handrail

Another gem in the range of DIY luxe upgrades is the Iron Baluster Staircase Rail. Builders offer this feature as a premium, but why pay a premium price if you dont have to?


This is quick project as long as you have the right tools.

Time: 2 people approx. 2 hours
Cost: $4-$8 per baluster / $1 per bottom shoe - for the Ravenna the total was about $200 shipped for upstairs and main floor
Difficulty: Easy

Tools Needed:
- Hand Saw, Reciprocating Saw or Jig Saw
- Channel Lock Pliers

Materials Needed:
Balusters
Epoxy


This will be the most terrifying part for those with weak dispositions to cutting things and commitment, but this is actually the most fun part. Take your saw and chop right through the middle.

If youre working on a long run with 8 or more balusters just cut a few at a time for stability.


The top of the wooden baluster is typically attached with some glue and a pin nail. Grab the top half with two hands and twist, it will easily release and fall right out.


For the straight run of balusters on the second floor, you just need to pull up and unscrew the bottom halves from the screw shaft, this technique doesnt work on the slanted parts.


After removing the wooden balusters, you will be left with screw shafts. These are very brittle and can be broken  off down near the wood with a pair of channel lock pliers.


Cut your balusters to size via your preferred metal cutting method (Chop Saw, Jig Saw, Recip. Saw, etc). Measure the height from the bottom plate to your handrail, add and extra 1 to 1-1/2" for the top part going up into the handrail.

Once you are satisfied, drop a dime sized bit of epoxy on the top of the baluster before you insert and also on the bottom plate in the center of the square. Wipe off any excess IMMEDIATELY.


Love it!


Good luck!

Saturday, March 16, 2013

DIY Iron Baluster Upgrade - Angled Handrail

Another gem in the range of DIY luxe upgrades is the Iron Baluster Staircase Rail. Builders offer this feature as a premium, but why pay a premium price if you dont have to?


This is quick project as long as you have the right tools.

Time: Approx. 1 hour per 10 balusters
Cost: $4-$8 per baluster / $1 per bottom shoe - for the Ravenna the total was about $200 shipped for upstairs and main floor
Difficulty: Easy to Medium

Tools Needed:
- Drill with 5/8" Spade Bit & 1/4" Wood Bit
- Hand Saw, Reciprocating Saw or Jig Saw
- Allen Wrenches
- Small bolt cutters (for screw heads)
- Large bolt cutters (not the cleanest but effective) OR some type of saw to cut the iron to size. 
This is typically completed with a Portable Band Saw, Chop Saw or Reciprocating Saw with Metal Cutting Blade

Materials Needed:
Balusters
Epoxy
Wood Glue
Painters Tape


This will be the most terrifying part for those with weak dispositions to cutting things and commitment, but this is actually the most fun part. Take your saw and chop right through the middle.

For the small slanted portions like these here you can cut them all at one time. If youre working on a long run with 8 or more balusters just cut a few at a time for stability.


The top of the wooden baluster is typically attached with some glue and a pin nail. Grab the top half with two hands and twist, it will easily release and fall right out.

The bottom requires a little more delicacy to make the end result cleaner as there is a screw attached to the bottom that is very brittle and will snap in half easily, making your job a little tougher.

For the angled riser potion of the stair, pivot the bottom half back and forth with mild force repeatedly. Once you have a lot of free motion, pull straight up and hopefully the screw shaft will be left.

For the straight run of balusters, you just need to pull up and unscrew the bottom halves from the screw shaft, this technique doesnt work on the slanted parts.


Complete Screw Method
If your screw shaft is still there, and it is off-center from the square area that is now revealed, all you need to do is use your bolt cutters or a reciprocating saw to chop the shaft off. getting it down to about 1/4" height is fine. You should put down some painters tape just to protect the area around the screw so you dont mar the surface.

screw was off center in the square which gives us space to drill a new hole


Broken Screw Method
If the screw shaft broke or if the screw is in the middle of the lighter square area, this will require a little more effort to deal with it. We need a hole at least 1/2" wide in the center of the square to hold our new baluster but we cant do that if the screw is in the way.


In order to extract the screw the easiest way is to drill three holes in a triangle shape around the screw to loosen its grip and simply pull it out..


Dont worry, as long as you stay within the lighter square while drilling, the holes will be hidden by the baluster shoe.


Alternate Broken Screw Method
With a 3/4" hole saw you can create a hole surrounding the screw shaft and with some other flat long tools coax the middle cylinder of wood out. You can skip the spade bit if you use this method.


Continuation
Now use your 5/8" Spade Bit drill a shallow 1/2" deep hole in the center of the square.


Now you need to cut your balusters to size. This is a personal preference but your baskets or other ornamentation should be centered in the height of the rail, so you will most likely need to trim some length from both ends of the baluster.


Tip: If you cut your baluster a little too short and you are not satisfied with how it looks, you can insert a plug cut from one of the wooden pieces to create a small platform in the hole.


There is about 2" of clearance up in the hand rail so you have plenty of room. Be cautious and cut long and then trim until you get the right fit.


Thread your shoe (remember to use an angled one if your on the riser part of the hand rail).

Insert the baluster into the top first. Initially it will appear to be too long, you will need to use force to push it up into the handrail and then it will drop nicely into the hole if your cut was accurate. If its too short, use the plugging technique described above.


Tip: We suggest doing dry fits to be sure you are happy with how the whole thing looks before using the epoxy which may mean inserting them all first, because the epoxy sets almost instantly and is nearly impossible to release.


Once you are satisfied, drop a dime sized bit of epoxy on the top of the baluster before you insert and also in the bottom hole


Insert, adjust the placement quickly as you do not have more than a minute or two. Secure the shoe to the shaft using allen wrenches.


Repeat...


For the straight part of the handrail, the process is a bit simpler.

Good luck!