 |
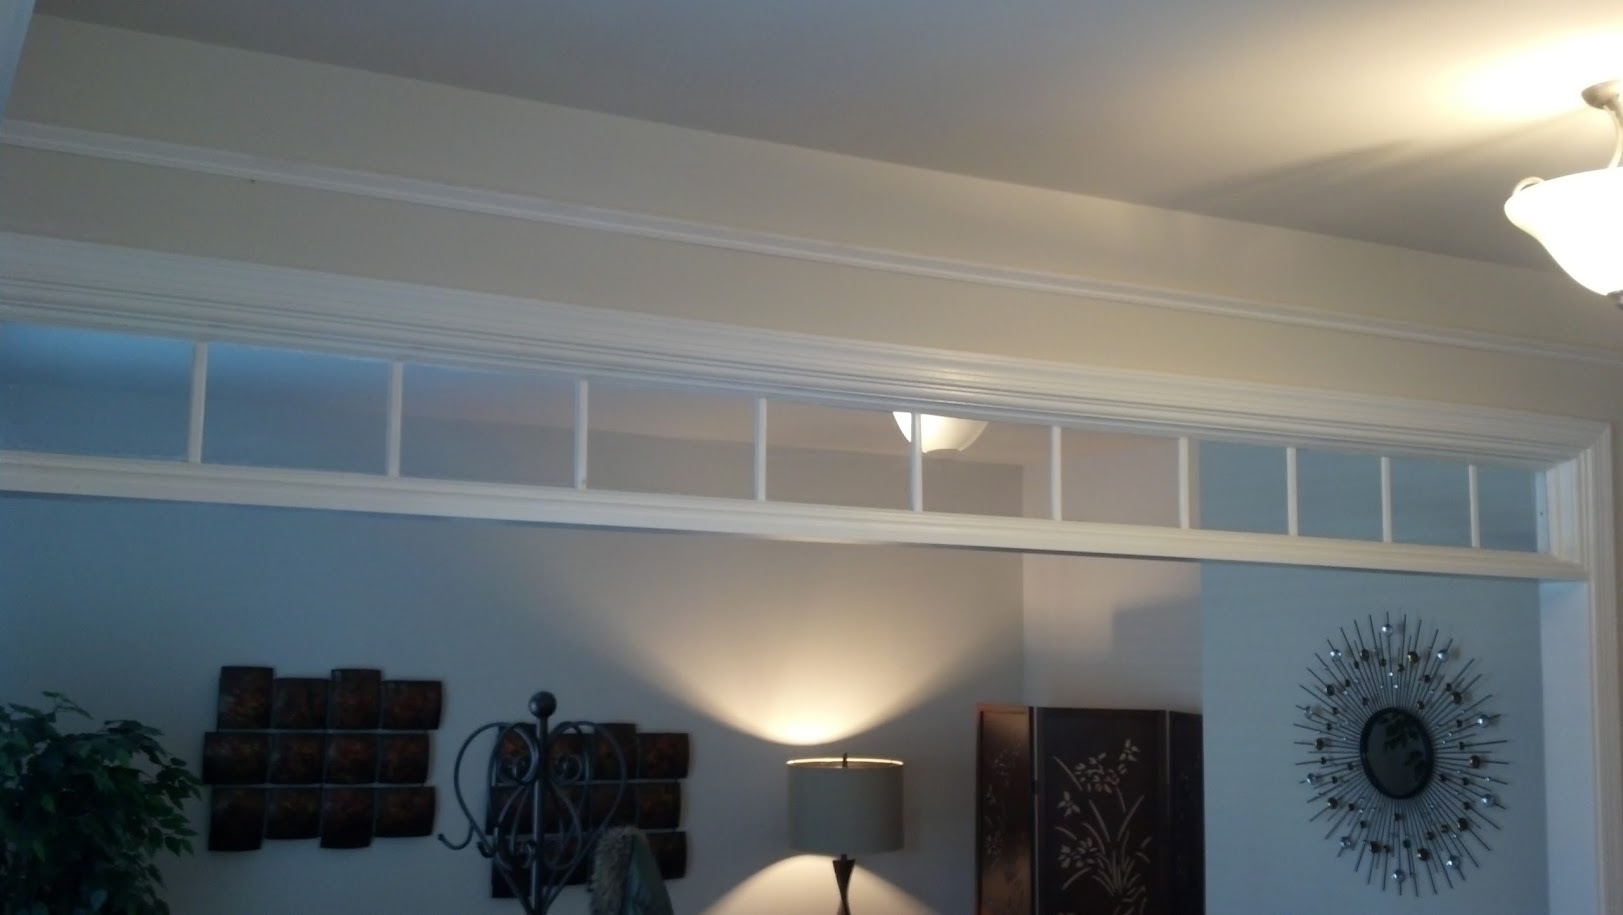
| You can also see the beginnings of our 2-piece crown above the window |
This is one of those premium features that will help to create that aesthetic pop that will immediately win over buyers.
Time: Weekend
Cost: Wood $60 / Plexiglass $25
Retail Cost: 10'w x 8"h - $680 (not including installation)
Difficulty: Mid-Level
Tools Needed:
Hammer/Air Brad Nailer speeds the job up immensely
Paint
Stud Finder
Miter Saw/Box
White Caulk
Clear Silicone
Plastic Scoring Tool
Wood Glue
Circular Saw or Table Saw
Materials Needed:
(These lengths are specific to our formal living room doorway which is 10' wide, smaller openings would obviously use less materials)

(2) 1x4x12' pine
(1) 1x6x10' finished trim (already primed & sanded smooth, no wood grain showing)
(2) 1x4x12' lattice
(4) 12' Stop Molding
(4) 12' Shoe Molding
(2) 8' Screen Molding (to create the fake window tiles)
(1) 2'x4' piece of plexiglass
Each 12 foot piece is enough for the 10' long sides as well as up to 12" short sides of the rectangle box. Ours is 8" high, which still leaves room for a French Door installation at a future date.
First, cut the 1x4s to the width of your opening as well as the desired height pieces and assemble into a U shape. Cut the lattice pieces to match and glue them in the center of the 1x4s

Cut your Stop Molding and glue it to ONE OUTSIDE edge of the lattice, this will require miter cuts on the corners. The other outside edge side needs to remain open so that you can insert the glass and sandwich it in between as one of the last steps. Some cheap clamps you can get from the dollar store will help to hold the pieces tight while drying.
 |
| Stop Molding |


Once the U shape is complete AND DRY with all 3 pieces (1x4, lattice, stop molding), complete the box with the last side following the same steps. Secure the 1x4 pieces to each other with nails.

Turn the entire frame over so that you are looking at the back side of the Stop Molding, where you would insert the glass. We painted in-between steps here, you can paint at whatever points you like. It will take about three coats to properly coat the wood.
Measure the length of space in between the lattice pieces from top to bottom, it should be 1/2" shorter than the inner height of your box. Using the plastic scoring tool cut your plexiglass the long way at that measurement. You should end up with 3 or 4 pieces of plexi.
Plexiglass is cut by placing it on a flat surface, and scoring it with the tool 4 or 5 times and simply snapping it. It is best to use a hard straight edge like a level to use as a scoring guide.

Apply a thin line of clear silicone to the back of the Stop Molding. Some brands go on white and dries clear.

IMPORTANT: If you are creating a long width window like we are, cut your plexi into equal lengths. For example: our window is 118", so it will take three pieces of 39 1/3" long plexiglass to fill this length.
DO NOT REMOVE THE PROTECTIVE COATING FROM THE GLASS
Lightly lay the first piece of plexi into the left size and gently tap around the edges, dont push too hard or you will have a lot of silicone to clean up and deal with.

Once the plexi pieces are in you can cut and install the closing side of the Stop Molding which will hold the glass in place. Use the clamps to hold the pieces tight and let dry.

While the glue dries, measure the width between the edges of the stop molding, cut your Screen Molding into multiple pieces at that height, these will be the fake separators to mimic the look of window panes.
 |
| Screen Molding |

Test place the new separators to approximate your panels equal width. There will be a few seams in between pexli panels which will of course need to be covered and the space remaining should be equal width and make it easy to figure out the width of each pane.

Before permanently placing the separators and painting the last coat, mark each location with some painters tape to show you where each separator will go, remove the separators, paint, let dry, then use a box cutter to trace around the outside corner of the glass, and then remove the protective backing.

You will now replace the separators at the correct locations by dropping a few dots of silicone to the back of each one and dropping into place, let dry, turn over window and do the same as above.
Mount for test fitting

Now for some finishing...
Doorway width is about 5 1/2" or so. Being that our 1x4 box is thinner than this, the spot where the window meets the wall wont look professionally finished. So we now add a 1x6 cut length-wise to the exact width of the wall to get a nice polished look.


In order to get the 1x6 to match the exact width on both sides of the wall (which is 5-1/2"on one side and 5-3/4" on the other), we cut it first to length to fit the doorway (10'), then we clamped it to the bottom of the window, and marked the 1x6 at the edges of the walls, take it down, draw a line connecting those marks and cut it the long way. This is required since no walls in your house will be perfectly straight and one side may be wider.
 |
| Cut to perfect width and caulked |

Exploded Side View
All done!
 |


